Pants Project

IMG_0829

It’s that time of year where the first cold wind sends me running for my long johns and I start thumbing through the LL Bean catalog and mixing hot toddies.  Every year I get a bit of a fascination with flannel, fleece, denim and thermal knit.  This year I’ve been thinking about the one pair of jeans I own.  I’ve had them a year and while I love the design and the fit, they’re starting to look a little worse for the wear.  The knees have gone baggy, they’ve started to fade and I wouldn’t be too surprised if they started developing holes.  In general, if I buy something new and in style I’ll opt for something that isn’t too expensive.  This leaves me with many things that aren’t as well made or long lasting as I’d like.  I got the idea to make new pants.  I wanted something that styled like a work pant (wide enough to fit over boots, roomy with big pockets) but would be warmer than any pants I’ve had.

IMG_0295IMG_0369

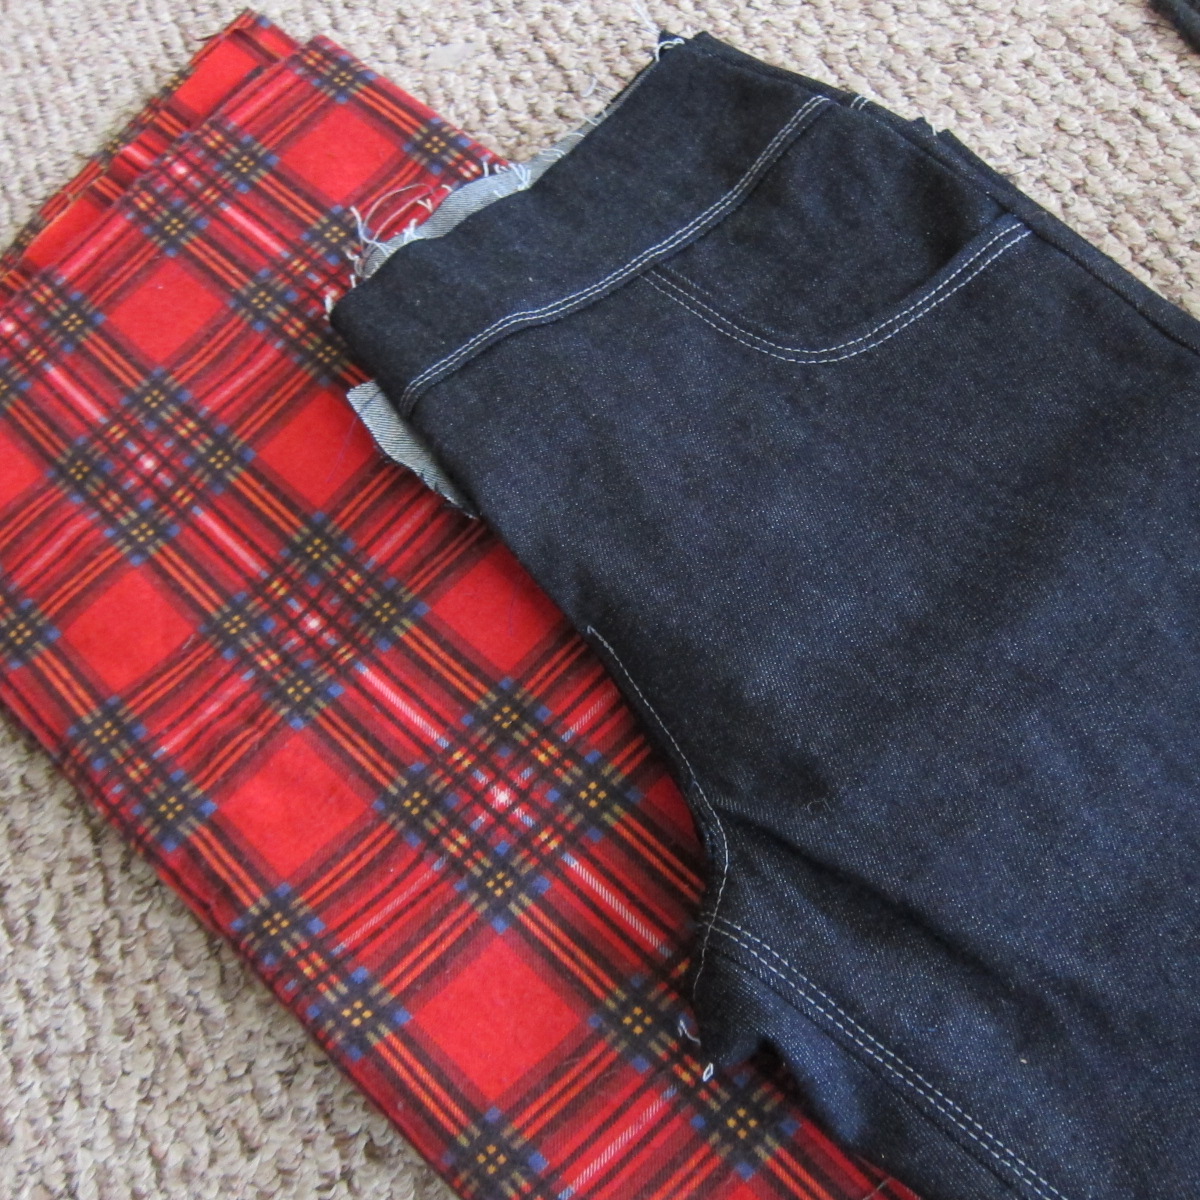
I started by making a mock up over the course of a week.  I hadn’t made pants since high school, about 2007 when low-rise jeans were still popular.  The only pattern I had for jeans was one with a very slim fit and low waist.  I changed the pattern a lot, making the pockets bigger, the rise higher and the legs roomier.  I ended up omitting the waistband in favor of a large yoke to which I’d attach the flannel lining. I didn’t want to spend much (as I didn’t know how these would turn out), so all I bought new was denim (a 98% cotton 2% spandex dark wash from Hancock’s) and a spool of heavy duty gray thread for top stitching.  The flannel, zipper and button I already had. I would like to make these pants again and match the zipper and button better and add rivets.

IMG_0368IMG_0653

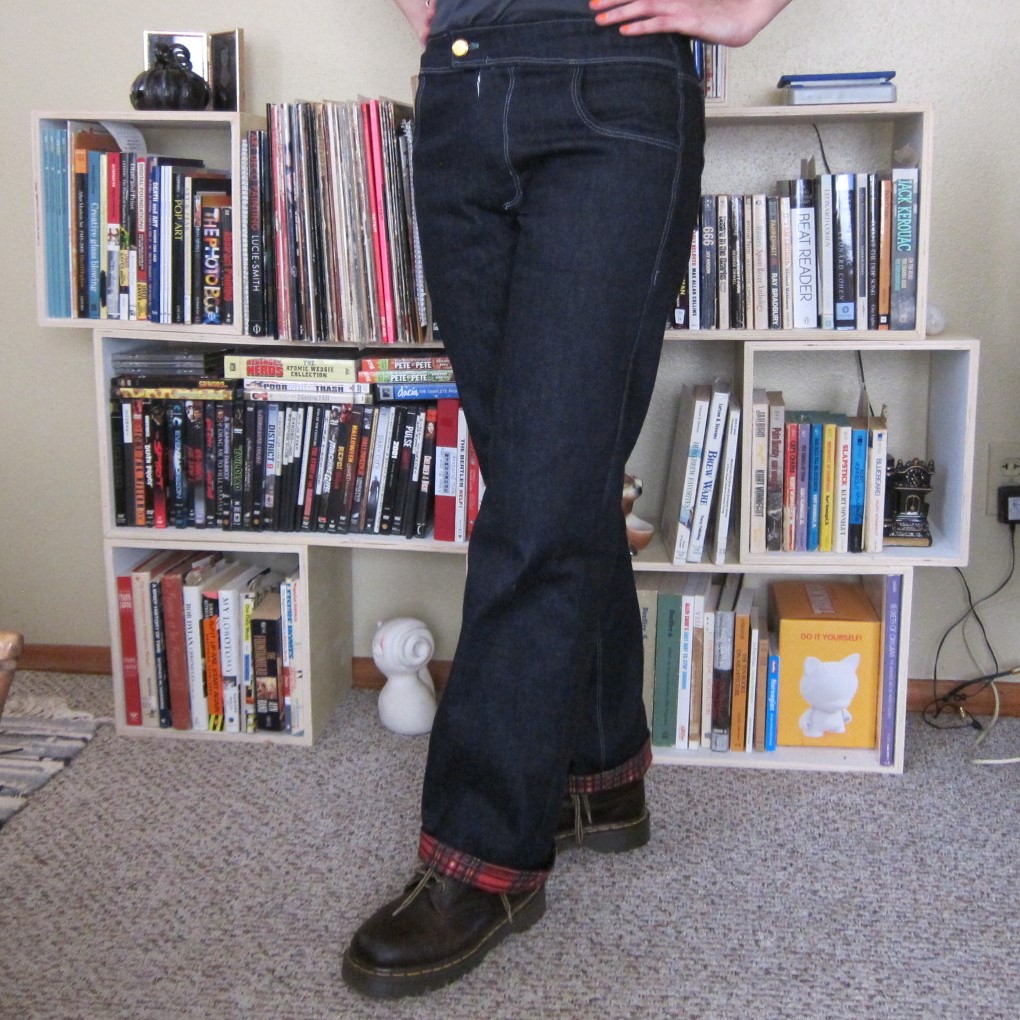
The denim I bought wasn’t very thick but the flannel is extra cozy.  I started sewing the legs together and top-stitching everything.  This part was pretty easy.  The hard part about making pants is the dreaded fly.  The only 2 other pairs of pants I made ended up with a fly that didn’t close right and just screamed “Hey look at this poorly constructed crotch!”.  So I took my time and spent several hours on the fly and front yoke/waistband.  I made the flannel lining out of just the leg pieces and sewed them to an inside yoke made of denim.  I joined the lining and pants at the top seam and stuffed the lining inside.  I stitched the two together at the bottom with a top-stitched seam and hand stitched the two raw edges left by the inside fly.

IMG_0847IMG_0886IMG_0858

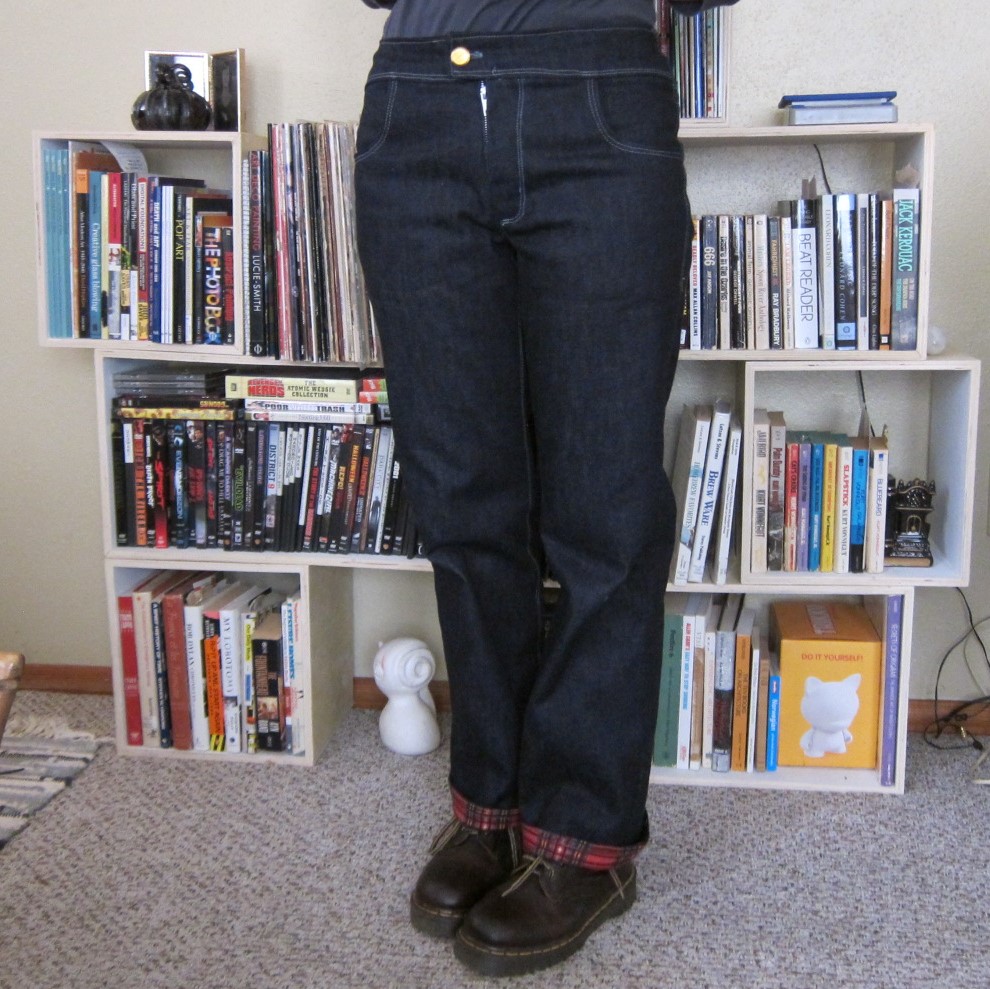
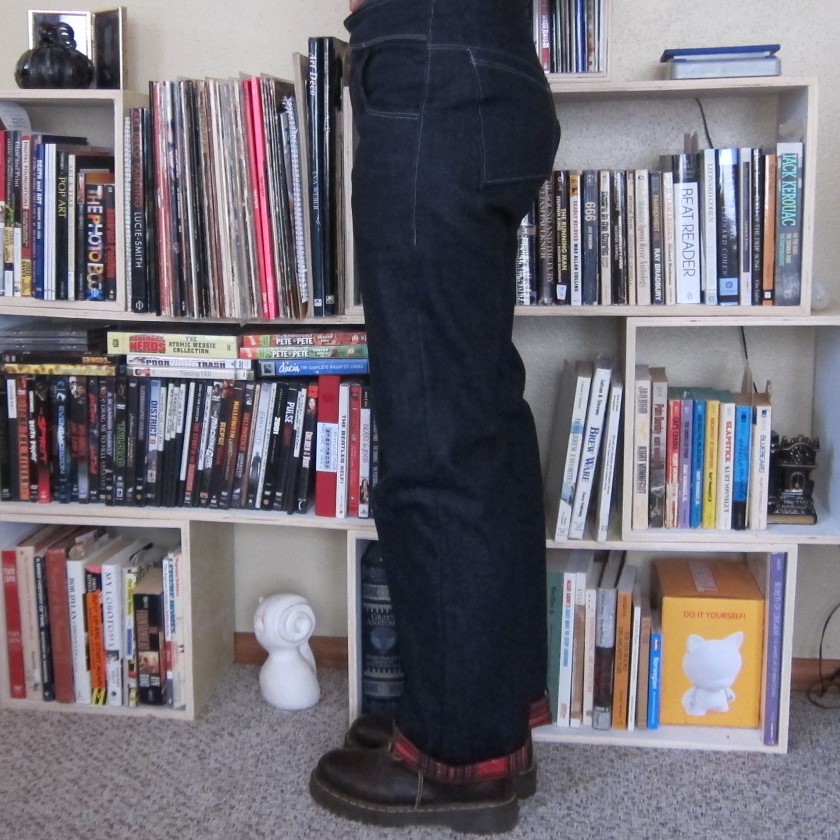
They turned out better than I thought they might.  They’re big enough that I can wear them over wool tights and leg warmers,  but they’re also form fitting where it counts.  There’s a tiny gap at the back waist but I’m not sure if I mind enough to take them apart and fix them.  The front fly came together well, but the zipper is still a bit visible. I probably shouldn’t have chosen such a bulky zipper, but again, I didn’t want to buy a new one.  I’ll be saving the revised pattern I made with these and will probably try the project again in the spring, aiming to fix some of what I didn’t like about these.

Advertisement

Tiny House Update: Week 25

This weekend was a bit of a step backwards.  My dad originally installed a Tarkett snap-together laminate flooring for the house.  After installing it my parents were disappointed with how it went together and looked.  After a few weeks of trying to warm up to it, my dad finally decided to rip it out and start again.  After buying Pergo brand laminate, we went to work replacing the floor on Sunday.  It was the first day after daylight savings time ended and I think everyone was tired and a bit frustrated, so we really didn’t get too far.

Handmade Winter Wardrobe Additions

So I started a capsule wardrobe a few weeks ago, made up of 40 items that I’ll wear all fall and then switch out with some new items for winter.  I thought that paring down my wardrobe would give me added incentive to sew, because I have a bad habit of making things and then never wearing them.  Knowing that they have to go into a small rotation or 40 things should make me more mindful in drafting up clothes that are practical and well made.

I have a wonderful pattern for leggings that I’ve used a few times (McCall’s M6173).  I raised the waistline a bit and cut them down some from what the pattern called for.  The fabric I used for these is a cozy woven cotton blend stretch fabric with gray designs on a black background.

IMG_9773

I also finally got around to finishing a skirt I started almost a year ago.  I made it after seeing a cable knit skirt for sale that I knew I could never afford.  I went thrifting and found an old sweater that I cut up and made into a warm skirt for winter.  I used some scrap fabric from the leggings to make the waistband, because the sweater scraps had too much stretch to serve as a good waistband.IMG_0147

I have a few more projects in the works that I’ll post later as I get more work done. The first project I’ve already started is a pair of work pants that will be lined in flannel. I’m modifying a pattern I’ve had since about 2007 when low-rise jeans were all the rage.  I don’t know if modifying this to my current tastes will be too difficult or not.  I’ll be making the pockets bigger, adding a few more utility pockets, reinforcing the knees and sneaking in a flannel lining.  I never find pants that fit and last for more than a year, so I’m hoping to get better at sewing pants and just start making all of mine.

Tiny House Update: Week 24

I promised my mom I would make the cabinets and counters for the house, but then I got distracted.  Before I even got started planning my dad started building.  I’m glad he did because I’m sure the cabinets will turn out much nicer now.  We were originally going for stark simplicity, but my dad loves a challenge and has been designing and fitting drawers, shelves and doors.  Today we got 3 drawers put in.  It was pretty challenging and took most of the day’s work.  In the end they fit well and move smoothly.  They look rough now because they’re just set in the shell of the counter, but soon we’ll finish the rest of the cabinetry and put faces and pulls on the drawers.  We were also able to cut all of the pieces for the other set of counters, on the opposite wall.

The work is going a lot slower now as the days get shorter, but every week it looks a little less like a box full of lumber and supplies and a little more like an actual house.

My Adventures in 3D Printing

Coming of age in a new millennium, I’ve always been in pursuit of instant gratification.  I can remember the first time I saw a 3D printer, or at least a video of one, was in a drafting class I took in high school (about 2005).  I was instantly in love with the idea.  It was like a tiny instant gratification machine.  It seemed perfect.  You wanted something, you made it.

Sometime in the last few years, Jason began researching 3D printers and decided our house needed one. I loved the idea but knew nothing about 3D modelling or machinery.  I asked him to teach me, but with a full course load and a job, he had no time.  He showed me where to download Sketchup and showed me a few basic functions.  After that everything I asked was met with the answer “figure it out yourself”.  I thought this seemed harsh at the time, but realized, months later, when I was designing and printing on my own, that he simply knew I would take those words as a challenge.  As it turns out with the free software Sketchup, there are a wealth of tutorials online.  I spent many hours reading tutorials and asking advice in online forums.

Our Solidoodle 3 came for Christmas, assembled, and in a big cardboard box marked “Solidoodle”.  We were a little put out that the mail man just put it on the porch and walked away without ringing.  Luckily none of the neighborhood kids thought it would be useful enough to steal off of our porch.  It took a little bit of setting up, but we were printing the first night we unboxed it.  I started learning to work the machine and cut my teeth designing and printing smart phone dummies (again, thinking about how often I let my cell phone act as an instant gratification machine).  They were relatively simple to design and wouldn’t take much time to print.  Still, my results were quite rocky at first.

026

Progression of failed prints

As it turns out, our several hundred dollar instant gratification machine worked better as an unending frustration machine.  As simple as the design really is (heating up plastic and layering it on a heated bed) there were a million things to go wrong.  As many times as I was able to print successfully, there were whole days where we could barely get the machine to do more than shoot spaghetti-like strands of plastic from the seams in the extruder.  So we ended up breaking a few parts, replacing them with better pieces, modding the printer to work better and crying with joy every time we could get it to run for a few days without problems.  Over the course of the winter we took the entire printer apart and reassembled it, reconnecting wires with ease.  This was my introductory course to machinery.

phone city in progress (2)

3D model made using Sketchup

While it still had problems frequently, we were then better able to address them.  My experiment printing dummy phones turned into a few planned art pieces that would combine the plastic dummy phones with glass cast inserts in the shape of crowded city tenements.  I found that printing models to cast was a great use of the new machine.  Before, if I wanted to cast something, I’d have to carve the item out of wax first.  This process is effective, but would be ridiculously time consuming to make something as detailed as a tiny model city.

IMG_20140209_163220_039

ABS 3D printed models, wax model and cast glass pieces

At the time, I’d been reading a lot of dystopian novels and was thinking about the cultural extremes that exist today.  My model cities, made up of clustered tenements would be juxtaposed against the height of new technology: the smart phone.  I was finishing up a residency after graduating college and had access to kilns and supplies, so while I was more exciting about 3D printing than anything, I knew it’d be a good idea to combine the two materials.  I printed the phones and the models for the glass pieces. Those models I would make molds of, pour waxes and then use a lost wax casting technique to cast the glass pieces I needed.  In contrast to the rocky time I’d had 3D printing them, I was able to cast 4 glass pieces successfully on the first try.

Use_1

“Dystopia” finished project

After almost a year of 3D printing, I’ve learned a lot of things:

  • There is no such thing as instant gratification, when it comes to making
  • Even someone with no experience can learn to 3D model, print and tinker
  • There are individuals all over the world using new technology to develop new ideas
  • The amount of new advances in 3D printing technology is utterly overwhelming
  • A 3D printer is just as likely to jam, sputter and malfunction as any temperamental inkjet printer
  • If you know where to look, you can find an answer to just about anything online
  • Hairspray is a wonderfully versatile art supply

At the moment I have a few more glass castings I’m working to finish up and incorporate into an installation.  I’ve got another project involving the 3D printer that I’m very excited to start work on.  In the next few days I plan to start fixing the 3D printer again (after the thermister has wriggled loose yet another time).   I’ll be posting updates as I fix, modify and likely cry over our little art-making machine.  I’d love to hear your thoughts on 3D printing and any of its possible art-related uses.

Tiny House Update: Week 23

Today we got started working on what will be the tiny kitchen.  With the floors, interior paneling and window trim installed it was time to start planning the cabinets.  Our plan calls for a kitchen that’s situated right under the larger of the two lofts.  It will have cabinets on both walls with a sink on one side with a two burner propane stove and mini refrigerator on the other.  For the cabinets we decided to build a simple frame that we would fit the appliances and drawers, shelves and cabinets into.  The outside will be finished with a 1/4 inch cedar and the top is a slab of spruce stained a dark color to match the flooring.

We started building the frame today, which gave my dad an excuse to buy a new tool (always fun).  After starting the cabinet frame we had just enough time to cut the counter top and mount it before positioning the sink.  We plan on connecting the plumbing (PEX tubing) later.  The sink we bought was a small stainless steel bar sink that was just the right size for the narrow counters.

Working in the fall has been a nice relief from the heat of the summer.  During the early months we started early when we were heaving plywood up to the roof and installing paneling on a scaffold.  We’d work until it was too dark to work anymore.  Now that its cooler and the projects needed to finish the build are getting less taxing, we’ve been starting earlier and quitting sooner.  With lights inside and a fan/space heater as required the work is less draining and more fun than the initial steps.  Since we’ve delayed the launch date until spring there’s also less pressure to finish it soon.  We’re finding that like any project, it’s going to take about twice as long as initial guesses.

How I Spent my Summer Vacation

Last year Jason and I had a chance to stay at Caravan, a tiny house hotel in Portland, OR.  For about the cost of a conventional hotel we were able to rent a 120 sq ft. house built on a trailer bed.  The little house had all the amenities you’d expect and all the charm you could ask for.  Shortly after our stay there we became obsessed with tiny houses.  As soon as we got back we told my parents about our stay and they too became tiny house fanatics.  My dad has always loved building with wood, having built the deck, the fence and many other things around my parents’ house.  My mom had always dreamed of having a cabin in the woods.  They both loved the idea of building something small and cost effective.  So they ordered plans and bought a trailer and in the dead of winter started planning.

Jason and I volunteered to help on the weekends and I must admit I was a bit overwhelmed by the prospect of building a house.  Throughout the process we’ve met many challenges and gotten a chance to use our problem solving skills.  Still, none of the challenges we met were too big to solve with a little time and research.  I dubbed myself the “project worrier” as I scrutinized everything and watched it fall into place despite my ability to worry and over analyze.  Now it’s October and we’d hoped to have it finished but have still made remarkable progress.  We hope to bring it to the place where we’ll park it in the spring. We still have floor to lay down, cabinets to build and appliances to install.  Until then I’ll be counting down the days and crossing my fingers for the arduous trek through mountains to rest this sweet little cabin its spot in the woods.